Thursday, May 31, 2012

Mini Fruit Tart

Decorated with half-strawberry
Topped with soft fruits
My daughter's kindergarten organized a potluck party to celebrate Teacher's Day.  On that morning, she woke-up early, looking forward to bring the mini fruit tarts to share with everyone.  She didn't eat any at home, wanting to bring all and eat together with her friends and teachers.  This is the first potluck party for her.


Handy container... to share with friends
... but when I picked her in the evening, I only found out that she didn't get to eat any.  Today, I made some especially for her..going to surprise her when she come home this evening... 


What I Used:
Tart Base
  • 200g Butter 
  • 330 - 350g All Purpose Flour 
  • 1 no Egg (whole) 
  • 1.5 Tbsp Icing Sugar
Egg Custard
  • 120g Butter 
  • 4 no Egg (whole) 
  • 6 Tbsp Plain Water 
  • 60g Castor Sugar 
  • 1tsp Vanilla Essence
How I did:
Tart Base
  1. Leave butter at room temperature in a bowl, sieve in flour and icing sugar.  
  2. Lightly stir egg in a separate bowl and add into the mixture.  Mix until combine, a dough form.  
  3. Press the tart dough into tart mould and bake at 180 degree C.  
  4. Leave to cool down and store in an air-tight container.

Tart Shell


Egg Custard
  1. Add butter, castor sugar and vanilla essence into a bowl.  
  2. Lightly mix egg and plain water together in a separate bowl and pour into the butter mixture bowl. 
  3. Prepare a water-bath over medium heat, cook the custard mixture on water-bath.  Stir with whisk from time to time until mixture is thick (similar to "kaya" texture). 
To serve
  1. Scoop egg custard into tart shell and decorate with fruits.
Points to hightlight:
Scoop egg custard into the tart shell only before serving, to keep the crispy texture of tart shell.  Best to serve with soft fruits, such as kiwi, strawberry, blueberry, canned peach, mango, grape, orange, etc.


Specially thanks to Ying Yin's Antie Hooi Sian @ www.yong-hobby.blogspot.com for sharing this wonderful recipe.

Friday, May 18, 2012

Family Weekend Excursion to Teluk Intan (Teluk Anson), Perak


My husband was invited to attend a wedding dinner in Teluk Intan last Saturday.  He looked forward to meet up with old friends and celebrate the auspicious occasion. 

We took this opportunity to travel with the whole family, my two kids and sister.  As the distance between Juru Tol  and Teluk Intan is approximately 228 km, we certainly need to stay a night in Teluk Intan.  Otherwise, it would be tiring to return on that evening after the dinner.  The bride groom recommended us home-stay instead of hotel.

The whole family started the journey at about 16:00 (this is the earliest we can made it!) and arrived in Teluk Intan at around 19:15. While travelling along the highway, there was intermittent rain especially before reaching Ipoh.  My two kids were corporative, sit quietly along the journey.  In fact, they enjoyed travelling and were looking forward to this trip especially my elder daughter.
Upon arriving in Teluk Intan, we tried to locate the location of home-stay from the map given to us but we failed to locate the place and our calls to the home-stay place were not answered.  At last, my husband had to call the groom (we tried not to disturbed him, at first) for help and he sent another friend over to guide us to the home-stay place which located near the crossroad of Jalan Changkat Jong and Jalan Sultan Abdullah.  The name of the home-stay place is TNT Novelty House
TNT Novelty House - front window
We quickly unload our belongings upon arriving, as my husband has to leave for the dinner.  As he left in a haste to attend the wedding dinner with his car, we couldn’t go out to have our dinner.  Unfortunately, the place we stayed, does not sell food but we did bring along some bread, snacks and drinks...

TNT - room wall
My younger daughter couldn’t sleep well due to unfamiliar surroundings and she had to wait for daddy to come back from dinner before she could sleep.  We check-in to a family room with one queen-size bed and single bed in one room and two single beds in separate chamber.  
TNT - single wooden bed
Room furnishing is simple and we liked the bed wooden frame so much, which is made from solid wood.

TNT - wall design & mirror
TNT Novelty House provides ample space for guest to sit in their living hall furnished with wooden chairs, reading tables, dining place, games corner, water fountain, TV room and laundry area.  Its a place worth a visit to explore the beauty of wood work!

TNT - Living Area
Drinking water, water pitcher and other kitchen utensils are provided for guest.  

TNT - Living Area


The rental is only RM60/night for an air conditioned room with attach bathroom.  We could park our car in the porch and there is a care taker looking after this place in the evening.  The house-owner also stay-in.  I consider this place safe, quiet, clean, simple and economical for budget traveller.  In fact, it is very clean!


TNT - games corner
Since the home-stay is located within the town of Teluk Intan, access to amenities such as banks, petrol kiosk, restaurants and shopping mall is easy.


Teluk Intan Chee Cheong Fun
The next morning, we have to pack our belongings and head to the town to search for a small shop selling “Chee Cheong Fun”, which is located before Pooi Yong School in a road connecting Jalan Pasar and Jalan Pasir Bedemar.  It was not easy to locate this shop, as the sign board was hidden.  In fact, when we arrived at 9:45am, the shop was about to close but fortunately take-away is still available and I bought four packets.  

The Teluk Intan “Chee Cheong Fun” is not the same as the usual one sold in Penang.  It is rolled-up with meat mixture fillings and served with pickled green chilli.  I still love the conventional Penang “Chee Cheong Fun” served with sweet sauce, prawn paste, and sprinkled with sesame seeds, but this is something different to me and it taste different from the conventional “Chee Cheong Fun”...

Teluk Intan Leaning Tower
Before leaving Teluk Intan, the whole family had a simple breakfast and then visited the Teluk Intan Leaning Tower (Tilting Tower), the famous landmark.  The leaning tower of Teluk Intan is the Malaysia equivalent of the world famous Leaning Tower of Pisa in Italy.  It is located in the centre of the town.  The tower is slanted leftward.  It is 25.5 metres tall and from outside, it looks like a 8 storey building.  The tower is located in the center of a square surrounded by Jalan Pasar, Jalan Selat, Jalan Bandar and Jalan Ah Cheong.  
Background Leaning Tower
We did not walk around the tower as there were crowded with people due to Sunday bazaar held around the leaning tower.

The whole family left for Bidor, the next town before returning to Penang.  Bidor is 42 kilometres away from Teluk Intan.  This town is mainly an industrial area.  When one travels north of Bidor, one will see miles and miles of plantation on both side of the trunk road covered with lush greenery, fruit orchards, oil palm and rubber plantations.

Before the advent of North-South Expressway, travelers had no choice but to pass through this town through the federal trunk road.  As this town is famous for its variety of food, travelers frequently choose to stop-by at one of the eateries before continuing their journey

Bidor famous  'Kai Jai Peng' 鸡仔饼
The most famous food in Bidor undoubtedly will be the herbal duck-thigh-noodle available at one of the eatery that is the famous Pun Chun. The restaurant is located on the main street.  Pun Chun is also famous for its 'Sat Kai Ma' (Chinese: 萨奇马)- a type of sweet dessert and also 'Kai Jai Peng'Chinese:鸡仔饼) which is the chicken biscuit.  Apart from these, another shop next to it, selling large curry chicken bun and hand-made animal figurine moon cake.  We bought some of these delicacies from Bidor for friends, baby sitter, parents and ourselves.

During our last stop to buy two large curry chicken buns, my sister left behind a packet of mango she bought at the market, in the shop after buying some moon cakes.  She only realized when we entered North-South Highway.  As it was not too far away from the Bidor town, we went back to the shop and was relieved to find that the shop owner has kept the mango for us, thanks...

As last Sunday was Mother’s Day, we celebrate it by sharing the large chicken buns with my parents, our baby sitter and myself.  Happy Mothers Day!

Besides these, the other famous produces in Bidor are seedless guava, petai (stink beans), soursop, mango  and durian.

It was a pleasant trip for all of us and we are looking forward for next short excursion with the kids again. 

Friday, May 4, 2012

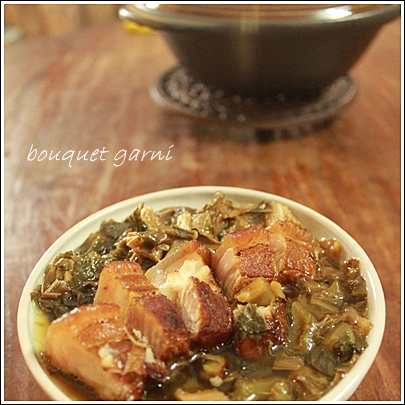
Braised Pork Belly with Salted & Sweetened Preserved Mustard Cabbages

I always wanted to prepare this dish... finally I made it!  
Invited my parents and sister over for dinner.  We have only this braised dish and steamed rice on the dinner table, nothing else.  A very down-to-earth dish but at the end of the dinner our guests left with satisfied face. 
What I used:
1kg Pork Belly
500g Salted Preserved Mustard Cabbage
250g Sweeted Preserved Mustard Cabbage
1/2 cup Cooking oil
1 bulb (medium) Garlic (with skin)
1500ml Water


Seasoning: 
2 Tbsp Light Soy Sauce
2 Tbsp Dark Soy Sauce (for pork belly)
2 Tbsp Oyster Sauce
2 Tbsp Sugar


How I made:
  1. Boiled salted preserved mustard cabbage in water for ~ 10 minutes.  Pour away salted water and repeat this process (boiled twice - if necessary), to remove excess salt.  Pour away salted water, rinse, squeezed the mustard cabbage and cut coarsely.
  2. Soaked the sweetened preserved mustard cabbage in water for ~ 30minutes.  Pour away water, rinse, squeezed the mustard cabbage and cut coarsely.
  3. Boiled pork belly in water for ~ 20 minutes.  Removed and pat-dry.  Marinate with dark soy sauce evenly.
  4. Deep-fry pork belly in hot oil until golden brown.  Dish up and soak into cold water immediately for ~ 20 minutes.
  5. Heat up cooking oil in pot, saute cloves of garlic with skin until fragrance.
  6. Then pour in water, seasoning, pork belly, salted & sweetened preserved mustard cabbage.  Covered and cooked until boiling.
  7. Reduced heat and braised for ~ 1.5 hours or until pork belly is tender.
  8. Remove pork belly and cut into slices.  Continue braise the mustard cabbage until gravy thickened.  
  9. To serve, place slice pork belly back on mustard cabbage gravy.  Serve hot.

Points to hightlight:
Highly recommend to use both salted and sweetened preserved mustard cabbage together for this dish.
If possible, for braising, used a heavy base pot which comes with matching cover.  I used cast-iron pot.

Monday, April 30, 2012

Steamed Moist Chocolate Cake

April is a month with lots of birthday celebrations!  Three family members and friends.  My daughter is six this year and I have baked (this year steamed) all her six birthday cakes.  Hope this will continue as far as I could...
She likes the steamed moist chocolate cake so much.  This recipe I have is very simple - simple methods (takes ~ 15 minutes preparation time and 45 minutes steaming), simple ingredients, simple equipment (no mixer, no oven required) and low cost... but the result is very rewarding!
Special thanks to yong-hobby for sharing this wonderful method.

What I used  

180g Butter 
120g Caster Sugar 
200g Evaporated Milk 
Eggs (slightly beaten with fork) 
100g Plain Flour 
50g Cocoa Powder 
1/2tsp Baking Powder 
1/2tsp Baking Soda 
1/2tsp Vanilla Extract 
2Tbsp Rum (optional)


How I do  

  1. Lined and greased a 7 or 8 inches round/square baking tin.  
  2. Combine butter, caster sugar, evaporated milk, and vanilla extract in a sauce pan and stir over low heat until sugar is dissolved and butter is melted.  Turn off the heat and keep warm.  
  3. Add the beaten eggs into the slightly cold evaporated milk mixture and stir till well mixed.  
  4. Sift flour, cocoa powder, baking powder, and baking soda into a large mixing bowl, then pour the eggs mixture and rum over the flour and combined well.  
  5. Heat up the steamer.  
  6. Pour the batter* into the lined baking tin.  Cover the top of tin loosely with a piece of aluminium foil.  Place the tin into steamer.  Cover steamer and steam at medium heat for 45 minutes.  
  7. Cool the cake before further decoration.
Equipments and tools I used
Steamer, sauce pan, whisk, strainer, aluminium foil (I recycled the aluminium foil from my daughter's soft pack milk powder)

Points to hightlight:  

*To make a smooth batter, strained before pour into the baking tin.  

Saturday, April 14, 2012

Steamed Water Chestnut Yam Cake

Whenever I see yam in wet market, I can't resist not buying eventhough when I have tight lecturing schedule. I remembered having some dried shrimps at home (from Kuala Kurau), hence I chose 3 pieces of medium yam, for Steamed Yam Cake. At the same store, I picked some water chestnut to add different texture to the cake. Am going to make extra this round. At home, we take yam cake as a meal, both the old and young enjoy it so much!
Ingredients I used:


  • 300g - 400g Yam (peeled, diced)

  • 50g Dried Shrimp (soaked, blended)

  • 10 Water Chestnut (peeled, diced)

  • ~40g Shallot (chopped)

  • ~20g Garlic (chopped)

  • 1/2 cup Cooking Oil

Batter:


  • 300g Rice Flour

  • 50g Tapioca Flour

  • 1Tbsp Wheat Starch

  • 1Lit Water

Seasoning:


  • 2tsp Salt

  • 1Tbsp Sesame Oil

  • 1tsp pepper

  • 1/2tsp Five Spice Powder

For decoration:


  • 80g Fried dried Shrimp (soaked, blended)

  • some Fried Shallot Flakes

  • some Spring Onion (finely cut)

  • some Red Chilli (thinly sliced)

Method I used:


  1. Combine batter ingredients, completely mixed well with water and strained.

  2. Heat up oil to saute dried shrimps over medium high heat until fragrant.

  3. Add shallot and garlic, stir-fry untill aromatic.

  4. Add yam, water chestnut and seasoning, stir well.

  5. Pour in batter, mix well. Stir over low heat until the mixture is thicker, remove from heat.

  6. Transfer mixture into a greased 9 inches baking tin (square or round), level the surface.

  7. Steam in a preheated steamer over high heat for 45 minutes. Remove from steamer. Leave to cool in the baking tin.

  8. Cut into desire size. Serve hot or warm with topping.

Points to hightlight:


I must sprinkle lots of fried shallot flakes on top of cake. Always make extra, everyone in the family love the fried shallot.


Also, to complement the yam cake, eat with chilli sauce and sweet bean paste.

Friday, March 30, 2012

Countless benefits of yoga of kids

Childhood is a vibrant time when natural energy and creativity are high, when eyes and minds are open and learning is fun!


This makes it the perfect time for kids to explore and enjoy their bodies, while in touch with how their minds' work and introducing them to the idea of inner self, the "soul".


We all have the potential to develop our inner self, and yoga can show us how. Yoga is expressive, and this is what makes it so appealing to the kids.


There are countless benefits of yoga for kids, but the principal focus is to nurture a strong, healthy body, a calm, contented mind and , with commitment, a sense of inner peace.

Wednesday, March 21, 2012

Stewed Minced Pork with Preserved Bean Curd

When my homemade preserved bean curd "matured", I used it in the pork stew. My niece was here for dinner the other day and she doesn't like stew minced pork so much, but this recipe with preserved bean curd, she ask for more!
I like this dish simply because it is suitable for the old and young at home. It goes well with a bowl of hot steam rice! Also, its very rewarding especially with homemade preserved bean curd add in to make the taste unique. What I used:

  • 500g Minced Pork (pork belly)
  • 200g Shallot (chopped)
  • 100g Garlic (chopped)
  • 20g Ginger (chopped)
  • 1/2cup Cooking Oil
  • 4 pieces Preserved Bean Curd
  • 4 nos Chinese Black Mushroom (medium - diced)
  • 2 Tbsp "Shao Xing" rice wine
  • 700ml Water
  • 1 Tbsp Light Soya Sauce
  • 1 Tbsp Dark Soya Sauce
  • 2 Tbsp Oyster Sauce
  • 15g Rock Sugar
  • 1 tsp Five Spices Powder
How I cooked:
  1. Heat up oil, saute chopped shallot, garlic, ginger until fragrant and light golden brown.
  2. Add minced pork, preserved bean curd and rice wine. Stir fry over high heat until pork is cooked and combined well with other ingredients.
  3. Then, pour in water, add seasoning and bring to boil. Covered, simmer over low heat and stew for ~ 1 hour.
Points to highlight: 
I love to add hard-boiled egg while simmering. Stewed eggs is another flavored dish at home. If you like the stew to be sweet, add more rock sugar to desired sweetness.